“I learned that we can do anything, but we can’t do everything… at least not at the same time. So think of your priorities not in terms of what activities you do, but when you do them. Timing is everything.” -Dan Millman
This quote holds true when it comes to managing your Facebook fan page content. If you plan out your content strategically, in advance, it can help you stay on top of your Facebook game-plan.
In this post, I’ll explain the various benefits of scheduling your posts in advance. And then I’ll give you step-by-step instructions on how you can do it with Facebook’s built-in post scheduler.
So here are some ways how scheduling your posts in advance can help you and your business:
#1 Be in control of your posting schedule
The timing of your social media marketing exploits shouldn’t depend solely on your on-screen availability. Because the problem with that is, the time period most convenient or most comfortable for you to use Facebook isn’t necessarily going to be the peak time period your target market will be online.
With a post scheduler, you have the opportunity to execute your content plans online despite being away from the computer. This enables you to entertain huge portions of your online audience even when you’re not online yourself. This can prove to be most beneficial if your businesses has fans that are scattered across different time zones.
#2 Create a content plan in advance
To be effective on Facebook you would require to do long-term content planning. With the post scheduler you can plan postings for a week, a month or a quarter in advance. You can now look at your content plan and ensure that it has a good mix of content types and a variety of interesting posts to keep your audience engaged.
Creating content in advance will make the posting process much easier to begin and pay dividends in the long run. It will also help you track your content ideas and incorporate changes if anything is missing from your current content pipeline.
#3 Determine & target the ideal time to post your content
In Facebook marketing, the quality of content and creativity of your marketing schemes don’t necessarily guarantee favorable feedback from your market. If timing isn’t right your business’s posts won’t even appear on the news feeds of your fans.
With post scheduler you can find out the ideal time and frequency for your posts. You can try experimenting by starting off with scheduling posts for different periods of the day and then assess where you want go on from there. The responses and results vary from market to market. Posting 1-2 quality post every day should be enough to keep your audience entertained, but again, it all purely depends on how you assess your market’s response.
So How Does It Work?
So let’s get down to the x’s and o’s, shall we? How exactly does Facebook’s post scheduler work, you ask? Well here’s the simple step-by-step procedure on how you can schedule your Facebook posts with the built-in post scheduler:
For desktop users:
1. Log-in to your official business page on Facebook as usual. On your page’s sharing dock, select the kind of post that you want to appear on your page (whether it be a status post, photo post, video post, etc.).

Type your Facebook post as you would normally
2. When satisfied with the content, click on the clock icon located at the lower-left portion of the dock to activate the time-setting dock.
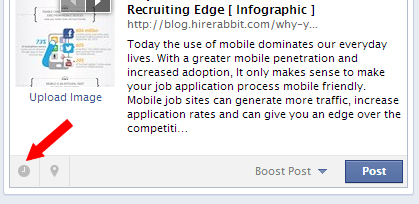
Click on the clock icon shown above
3. When on the time-setting dock, you will be prompted to select the appropriate year, month, day, hour, and minute you’d prefer for your post to appear on your page. Select your preferred time accordingly.
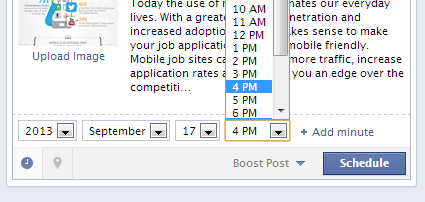
Select date and time for your post
4. Once you have settled on the preferred scheduling of your post, double-check everything. Make sure the content that you’re posting and the schedule for when you want it to be posted are definitely what you intend.
5. Ready to schedule that post? Great. Glance over to the lower-right portion of the sharing dock, you will notice that the usual Facebook “Post” button has been replaced by the “Schedule” button. Click on it.
6. Success! You will then be prompted with a dialogue box from Facebook confirming the details of your scheduled post. You are then given the option to view/edit pending posts that have been scheduled previously or close the dialogue box.
7. Should you, at any time, wish to review/edit your scheduled posts, you can access your post queue via the Activity Log. To access your Activity Log, click on the “Edit Page” button located along the Admin Panel of your page. Choose “Use Activity Log” from the drop-down menu.
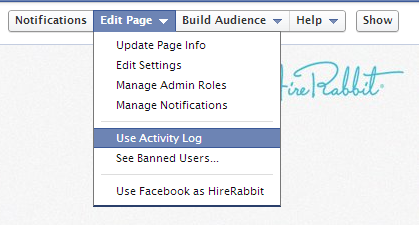
Use activity log to see your scheduled posts

View/Edit scheduled posts
For mobile users (iOS and Android devices only):
- Open your “Pages Manager App”. If you don’t have the app installed on your device, download the app for free from your respective App Store.
- Select the type of post you’d prefer to be scheduled to be added to your page (status, photo, video, etc.).
- Tap on the clock icon located at the lower-left portion of the share box.
- When prompted to do so, input the appropriate date and time for when you prefer your post to appear on your page.
- Review the details of your scheduled post. When confident with the content, tap on “Schedule”.
There you have it! Scheduling your Facebook posts is as simple as that. Now you have the ability to maximize your time online even when you’re not online yourself. Do share this article around if you found this helpful.
Are you using Facebook’s post scheduler for your page? What are some of the benefits you have experienced of scheduling posts in advance? Share it all in the comment box below.



Pingback: 6 Reasons Why Your Facebook Fan Base Is Not Growing « @HireRabbit Social Recruiting Blog!
Pingback: Procrastinator’s Guide To Facebook Business Page Setup
Pingback: 12 Ways To Promote Your Facebook Career Site On A Budget
I do schedule posts on facebook once in a month for my business website using the scheduling tool but usually spend as much as two hours because I repost old posts and schedule for the next 30 days. After this I spend less than an hour daily engaging my fans and replying questions and/or comments.
I’ll try out this method of yours – seems easy